First of All Happy New Year!!!
Working with Helix Design Principle using Habitat framework and Sitecore 8.2
So first You need to go through the official documentation https://github.com/Sitecore/Habitat/wiki/01-Getting-Started
Because i am also gone through it and followed all the steps.
Now i am going to explain and put the snapshot step by step that how i setup habitat with sitecore 8.2
Before going to work i would like to tell you guys that please check that do you have all the prerequisites exe and files.
files and exe:
SIM
Sitecore 8.2.zip
MongoDB with created services
NodeJS
VS2015
SQL
And the most important thing is Google access.
Now Let's start
So first Clone the habitat solution project from github repo:
https://github.com/Sitecore/Habitat
and after this goto root directory
and install npm by looking this image
so what we did,
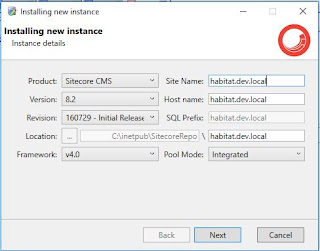
we install SIM and if already exist then we start by creating instance like in image
click on next
and now select webform package as required in habitat
and click on next
and now it's ready you can check this with browser by opening url as
http://habitat.dev.local/
and once it's done
open visual studio as administrator
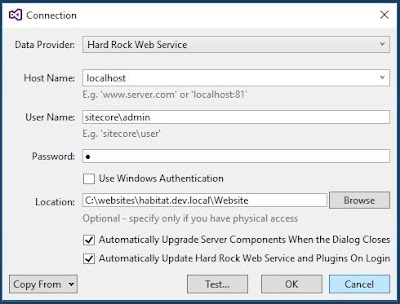
and open habitat project that we cloned earlier and now we create sitecore connection for habitat.dev.local
and after filling all the field verify by click on test button
once setup the connection then and once done rebuild the solution
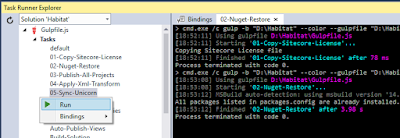
and after this open task runner windows
and then follow the steps and run the task
01-copy-Sitecore-Licence
Working with Helix Design Principle using Habitat framework and Sitecore 8.2
So first You need to go through the official documentation https://github.com/Sitecore/Habitat/wiki/01-Getting-Started
Because i am also gone through it and followed all the steps.
Now i am going to explain and put the snapshot step by step that how i setup habitat with sitecore 8.2
Before going to work i would like to tell you guys that please check that do you have all the prerequisites exe and files.
files and exe:
SIM
Sitecore 8.2.zip
MongoDB with created services
NodeJS
VS2015
SQL
And the most important thing is Google access.
Now Let's start
So first Clone the habitat solution project from github repo:
https://github.com/Sitecore/Habitat
and after this goto root directory
and install npm by looking this image
and after install you will see node_modules under root directory
and now it's time to create sitecore instance for habitat as "habitat.dev.local"
so what we did,
we install SIM and if already exist then we start by creating instance like in image
click on next
and now select webform package as required in habitat
and click on next
and now it's ready you can check this with browser by opening url as
http://habitat.dev.local/
open visual studio as administrator
and open habitat project that we cloned earlier and now we create sitecore connection for habitat.dev.local
and after filling all the field verify by click on test button
once setup the connection then and once done rebuild the solution
and after this open task runner windows
and then follow the steps and run the task
01-copy-Sitecore-Licence
and then once complete
02-Nuget-restore
and now stop here and before running third task before doing this stop the instance from IIS
once stop then run the third task
03-Publish-All-Projects
after running successfully move to fourth and fifth task
and now that's it from solution side.
Now goto the IIS and start the site for Habitat again.
and now check the habitat.dev.local/ on the browser
Thanks for your patience and time.
And if you have any issue while setup habitat instance then comment below
It will be great for me to learn something new from you guys
All the Best!!!
And have a great day....


