Monday 25 September 2017

Reason behind recycling IIS while development

Recycle is one of the tasks of IIS (Internet Information Services). So before going to explain let me tell you about IIS first.


sitecore-iis-error


On the IIS we do generally:

IISRESET, to start/stop www publishing services. When we do IISREST request then it applies to all applications on that are hosted on the IIS.

RESTART, to start/stop the process for particular application. Continues the services for other hosted application without any interruption.Generally, it initializes the website.

REFRESH, we generally do this process with session-oriented applications.

RECYCLE, our main focus on this because it's faster the others like RESET or RESTART. Recycle introduced from IIS6. It designed to restart only one application Pool means worker Processes

Actually When we do recycle then it creates the new process and after that HTTP.SYS dispatch the incoming request to newly created process and once all the requested got dispatched older process destroyed automatically.

Advantages of using Recycling:

  • no lost of the current application.
  • Once the process is created then older one is getting destroyed.
  • takes the guarantee of no lost of content.
  •  faster than IISRESET/RESTART.
  • Each time new data is getting stored into the worker Processes.

We can recycle the App Pool with two ways:
1. cmd> 'run AppPool/?'
2. with IIS Manager

Now come to the IIS Manager, basically, it has mainly three main components:
1. HTTP.SYS: It's kernel component, not part of w3wp.exe. It never uses virtual memory. And the main task of this component is to route the incoming request to corresponding AppPool.

2.  Worker Processes/AppPool/ w3wp.exe: It handles all the contents and also runs the dynamic contents. such as ASP.NET App.

3. IISAdmin: it manages IIS config as window services management.


Sunday 17 September 2017

Create custom ContentEditor Field in Sitecore?

First of all, I would like to explain about Content Editor fields in Sitecore.

So let's start, while creating a template in Sitecore we require giving field type like:
SingleLine Text
Rich Text
DateTime
Droplist
Multiline Text
etc.

Now sometimes content editor ask developers for custom Content Editor Fields in Sitecore.
So with this blog, I will create custom content Editor Field by making a replica of existing field types.

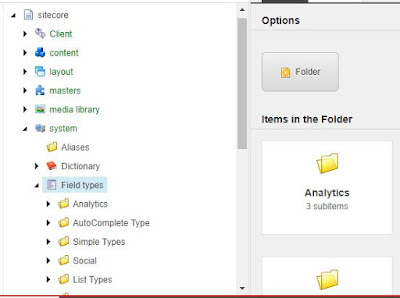
 So First go to the place where all the existing content editor fields are placed in Sitecore that mean Core Database.
sitecore-field-type-tree


Now Create your own custom field Directory at /sitecore/system/Field types where will put our customfield datatype item.


After creating custom field directory now it's time to create customField Datatype item at /sitecore/system/Field types/CustomField


sitecore-custom-field-tree


and given the assembly and class name of custom FieldDatatype as above.

Here is the code snapshot where we inherited the existing Sitecore field type item

sitecore-custom-field-class


Now come back to Master Database and on template uses this custom field datatype.


sitecore custom field type


And yes we successfully created a replica of the existing field type.

sitecore-custom-field


Now it's on you which type of custom field we wanted to implement.


Tuesday 12 September 2017

How to Create RSS Feed in Sitecore?

Before going to start creation process,

We will go with traditional way (Safe and Solid) means first What, Why and How ?


1. What is RSS Feed?

is Rich Site Summary responsible for the delivery of continuously changing web content. For Example: Suppose you have so many sites, portals and social media platform where you want to update your latest content automatically listed then RSS come into the existence.

So it's really amazing technique for Content Publisher.

2. Why to use RSS Feed?

Why, good question.
Suppose you have content related to:

Latest Events
Latest News
Latest Blogs
Latest Offer Posts
etc..

which you want to publish automatically on the other sites, platform then use RSS Feed.

3. How to create RSS Feed for our Sitecore Instance?

Now come to last but not least, So let's start creating RSS feed in Sitecore.

Oh I forgot one important thing, Let me explain here - "to publish latest content automatically using RSS on other sites you need RSS external URL"

for example: YahooNews (http://news.yahoo.com/rss/)

Now In sitecore at which path you wanted to put your RSS item means
here I will put my RSS item at home level So that every item will be listed.


now here at this path will create RSS item of template type "/sitecore/templates/System/Feeds/RSS Feed"


after creating RSS item give the input for fields

like the link of the item to list all the descendants, Link of the instance


now design RSS for the item which we want to list to the RSS genreated link's content.


sitecore-rss-page-item

sitecore-rss-feed-design


after this, publish RSS item and also item for whom we design RSS(here will publish home item bcz we set RSS design for this item).
and hit /run on the live mode and yes we achieve this.


sitecore-rss-item


Have a Great Day, Let me know if any issue will my pleasure!!!


Monday 11 September 2017

Forgot Sitecore Admin Login Password?

There were one scenario where i forgot the admin credential for sitecore login after changing. And it was like headache for me.


So we were trying to figure out how can we fix this issue and revert the changes and found the solution.

And it's not complex. So let's start:

First open the SQL Server and open that sitecore instance core database.

After this run this below Query

"UPDATE [aspnet_Membership] SET Password='qOvF8m8F2IcWMvfOBjJYHmfLABc=' 
WHERE UserId IN (SELECT UserId FROM [aspnet_Users] WHERE UserName = 'sitecore\Admin')"


and it will reset the password with default one means "Admin/b(Username/Password)"

You can also try this if wanna reset the password.

Have a Good Day!!!

Saturday 9 September 2017

Sitecore Custom RTE Profiles

After the understanding of RTE field now it's time to use, Change and then customize with It. Overall playing with RTE in sitecore.


So first thing is there are four types of RTE profiles which are already provided by Sitecore to navigate these RTE Profile will jump to core database at "/sitecore/system/Settings/Html Editor Profiles" and these are:

Rich Text Default
Rich Text Medium
Rich Text Full
Rich Text IDE
Rich Text Mail (newly added)


and by default when we are using RTE field in the template then Rich Text Default is already set as data source on the RTE field.


 And the best thing is we can change the data source with other existing RTE profiles.


Now it's time to create one custom RTE but before creating custom RTE, let's discuss why we need to create custom?

Suppose You want to add more tool to the RTE editor options, or just want to remove some options and you are definitely sure that in future you are not going to use. then we use custom RTE.


And now one question is raised that why we are not going to change into existing RTE profiles then my opinion is, "If we will change to the existing RTE profiles then it may impact to the existing RTE field for other items, and we exactly didn't know at what places exactly existing RTE is getting used".


So instead of taking risk we will just copy the whole RTE and will create newer one and here we will customize.


So let's start

1. will go to /sitecore/system/Settings/Html Editor Profiles

2. now will copy Rich Text Full  Profile (here will prefer to copying the existing RTE with Full functionality Profile, so that will remove which i don't want and will add according to my requirement)

3. now will move back to master database and will give the data source of RTE with new one RTE Profile which we want to use.


Please let me know if you are facing issue while using.

Thursday 7 September 2017

How to add class to RTE field in Sitecore?

Before starting implementation,


Idea Behind adding class to RTE

---------------------------------------------------------------------------------------------------------------------

why we are adding our class to RTE field?

So suppose you developed items and deliver to the client. Now from client side, one content author is going to edit RTE field and now if wants to apply some css to the selected content.  Then can do this but giving inline css and Now think about it that if he wants to repeat this task again and again.

So each time he had to add inline css.
And In Sitecore, "we reduce the repeating task and trying to achieve reusable logic."


Who exactly going to use and take the advantage of this ?

Definitely Content Author's life will be easy while he wants to apply specific css to the content.
They will just select the content and apply the class that's it, no need to add inline css every time.


-------------------------------------------------------------------------------------------------------------------

Implementation

Now come to the point, Adding css Class and definition of that class once to RTE base implementation and will reuse as many as time we need.

So before starting adding Class, "Check which css is being used for RTE."

To check this go to sitecore.config and find keyword as "WebStylesheet". Actually WebStylesheet is pointing to settings in Rich Text Fields.

<setting name="WebStylesheet" value="/default.css" />

By default, "default.css" is there but sometime is changed so it's good before change.


After this go to "<instance_name>/scwffm\Website\sitecore\shell\Controls\Rich Text Editor\ToolsFile.xml"

add the classname and value.


and after that write the css definition to the css file, (WebStylesheet is pointing).

Now open the sitecore instance on the private browser because sometimes the class is not getting appear even after the changes and it's because of the cache issue. If still class is not getting appear then  recycle AppPool


Let me know if still getting issue.

Wednesday 6 September 2017

Why and when to use Rich Text Editor in Sitecore?

Was thinking about RTE in Sitecore and below are my Investigation. Let me explain

Why we are using Rich Text Editor (RTE) data-type while development ?
And when to use RTE ?

Advantage of using RTE:

RTE provides advanced editing functionalities
              tools for editing like font-style, inserting sitecore link, media link, symbols and also settings like find and replace.


Like we are using Microsoft word in sitecore for RTE field
              it's like we are inserting content in Microsoft word office, we can edit font-style, inserting symbols, insert links.


We can directly apply class definition by selecting from drop-down on selected text in RTE field
              we can add our own custom class to the drop list, So that content author can apply the class to the content at the time of creation can apply class directly without help of  designer/developer.


Have different types of RTE Profiles
              we have four different types of RTE Profiles, which we can give as data-source to the field as per requirement:

  • Rich Text Default
  • Rich Text Full
  • Rich Text IDE
  • Rich Text Medium

When to use RTE data type
             When feels that content may contains links(internal or external), images or symbols then it will be good to use RTE.
And if content contains more than one line of content which contains only text or external links then instead of using RTE should use Multiline text data type.


we can also add our own custom RTE Profile as per our requirements. and on this will discuss later


Tuesday 5 September 2017

Publishing option on menu

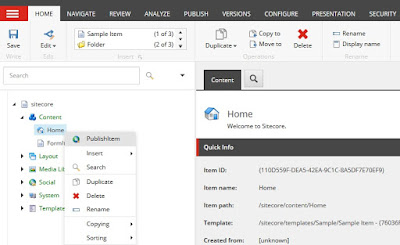
While development with sitecore, each time after the work on the item we need to go to the publish ribbon and do the publish stuff. So was thinking that it will be great, "If on the right click of the item we get the publishing option."

And yes, successfully achieve the desired requirement. Believe me it was really interesting and required small changes that's it.


Let me explain steps that will take around 10 minutes to achieve this functionally.

1. Login on the sitecore instance and jump to core database.

2. Go to the Tree up to /sitecore/content/Applications/Content Editor/Context Menues/Default 

3. Create one item of type /sitecore/templates/System/Menus/Menu item  with name ItemPublish.

4. Give the message field value as item:publish(id=$Target) and that's it.


5. Save the item and come back to master database. And now it's time to test.


custom-sitecore-publish-button


Also uploaded one package on marketplace can check by clicking here.

Thanks for your valuable time.

Monday 4 September 2017

Pipeline using Sitecore Rocks

After working with Site Definition using Sitecore rocks. Now it's time to check and add new pipeline using sitecore rocks.

First you need to select instance and then right click select Manage option


now go to second menu section as Pipeline and you will see all the pipelines will be listed that are applied to the instance.


after selecting anyone of the pipeline like publish you will see all the processors applied to that pipelines
and if you wanted to add you own custom pipeline's processor by just right click


add entry for class and assembly, now test is it valid or not? 


If valid then you pipeline entry has been added, enjoy buddy.


Sunday 3 September 2017

Cache using Sitecore Rocks

While development with sitecore, sometime content is not getting updated because of cache issue. To overcome this issue what usually we do:

1. <instance_name>/sitecore/admin/cache.aspx 

2. Recycle AppPool from IIS.

3. Browse page on private browser mode.

there is one more option but it is more flexible and much fast, yes it's with sitecore rocks.


Let's do practical on this:

First need to go instance, right click and select Manage option


after this will see Caches Section with cached listing items with all the properties.


let's select one of an item from cached listed items


After selecting one of an item will have two options:

either clear all cache means it will clear all the cached item which all are listed

or cache means it will clear cache of this item as well as child of this item also.


let's explore one of an item from the list, and will see all the child items


now from this list we will have option to remove from cache, instead of clear.


 Now suppose you are working on one of rendering and after the development just remove that item from cached list that's it.
you will see the new changes.


Hope will help this.


Saturday 2 September 2017

working with Temp file using Sitecore rocks

It's always good to keep clean and minimized as much as possible. Like temp files on the sitecore instance reserve memory which is unnecessary and to remove/clear all the temp files at one place using sitecore rocks is very easy.

So let's start first go to instance and right click, select Manage option 


now jump to Temp Files section, here you will see all the temp files are listed will reserved space and path


you don't need to go particular file location, just right click on the file and perform your option as below.
Really by this i'm enjoying while development.


Thanks Sitecore Rocks to save our valuable time!!!

Friday 1 September 2017

Site Definition using Sitecore Rocks

To add new site without using Sitecore rocks, usually we go to sitecore.config file and made the changes, which is more risky and we should have knowledge about all available attributes/properties while adding new site


But after spending sometimes on the sitecore rocks found pretty good way to add new site without worry about attribute/property. So let's start

By selecting instance and then right click, select Manage option:


After that Sites section is getting appear just down to the Section menu will get all the sites listed.
Here selected Shell and all the properties is getting displayed at the bottom. You can check all the properties applied to this site like Caching, Configuration, Content, Debugging, Devices, Filtering, Information, Inheritance, Security and main thing is Web
below we expanded Web property 


Now if wants to add new site to existing instance then just right click and select add new site option


After this will got property window for new site as below:


once all the info filled, after clicking on OK will get popup to save separate newsite.config just save this to website/app_config/Include


Congrats new sites entry is successfully added to sitecore instance.
Now it's time to work with pipelining using sitecore rocks


Properties on template using sitecore rocks

After creating template, it's time to add properties to the template.
Like
set icon on the template
     Help to identify the template belongs to which type.

Give the display name for that template
     On the template, we have an option to give the display name for template

sort the template fields
     We have also option to sort the fields on the templates

set insert options
     It's helpful to us when creating page item of this template type.
     It bound to content editor to create only given time of template type can be created.

or set the presentation details on standard value of the template
     It's always good to set presentation details on the template standard value. So that at the time of page creation by default these presentation will be applied.


Hope it will help.

Creating Package using Sitecore Rocks

After uploading, installing and creating Anti package using sitecore rocks.
Now It's time to create package using sitecore rocks.

Believe me it's fast and very easy to create package using sitecore rocks even you just need to drag and drop to include items/files while creating package.

After selecting sitecore instance right click and select Manage Package option as below:


and after that will get the option to Create package under Create Section select New Package and click on the Create button


Now will get three main sections:

1. Information Section:

 here you need to put all the necessary information related to package creation, and after giving all the information go to next section "Items"


2. Item Section:

In the Items section you need to drag and drop to include sitecore items (not file) as below selecting one rendering item to include


after dragging Item will getting also appear under the Items section. 


And if need to include all sub item of this item just right click on the item under the Items Section


3. Files Section:

after this it's time to add files to package go to , so you will have access of website and data folder directory to select files


after selecting the all the items/files it's time to build package means package creation.


after selecting build package will get the location option to save package which is going to create.


once select the location you will get success message of package creation.


 Congrats package has been created using Sitecore Rocks.