Monday, 14 November 2016

Getting Started with Jasmine

Before Going to start i would like to tell you that you can setup jasmine test framework with three way on your project.

So i am going to start explaining and also show you snapshot and setup jasmine parallely

Way.1
Jasmine Test Framework with Visual Studio :

to begin setup i would like to tell you prerequisite to work with Jasmine

you should have
       Visual Studio 2012 or more
       ASP.NET MVC 5.0
       Jasmine Test Framework


Now make sure that you are going to create .NET 4.5 project  otherwise NuGet package manager will fail during installation process.

Create A Project:

create blank web application project.
and create directory named as App Start, Content, Controllers, Views, Models, Scripts
at root level.
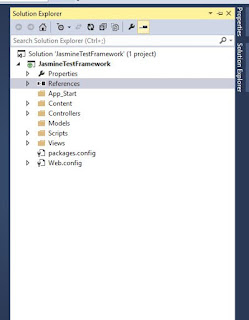
now on top left select third icon View->Other Windows->Package Manager Console

and run this command


Install-Package JasmineTest 


Hey wait guys, don't be hurry because we need to tell server that what to do when we request
which can be we do with creating RouteConfig.cs class inside App Start

and put this code there


public static void RegisterRoutes(RouteCollection routes)
        {
            routes.IgnoreRoute("{resource}.axd/{*pathInfo}");

            routes.MapRoute(
                name: "Default",
                url: "{controller}/{action}/{id}",
                defaults: new { controller = "Jasmine", action = "Run", id = UrlParameter.Optional }
            );
        }
under the class.

And now add Global.aspx to project

and make entry this code under global class
protected void Application_Start(object sender, EventArgs e)
        {
            RouteConfig.RegisterRoutes(RouteTable.Routes);
        }

Now create web.config under views direcotry
and paste the code


<?xml version="1.0"?>
<configuration>
  <configSections>
    <sectionGroup name="system.web.webPages.razor" type="System.Web.WebPages.Razor.Configuration.RazorWebSectionGroup, System.Web.WebPages.Razor, Version=3.0.0.0, Culture=neutral, PublicKeyToken=31BF3856AD364E35">
      <section name="host" type="System.Web.WebPages.Razor.Configuration.HostSection, System.Web.WebPages.Razor, Version=3.0.0.0, Culture=neutral, PublicKeyToken=31BF3856AD364E35" requirePermission="false" />
      <section name="pages" type="System.Web.WebPages.Razor.Configuration.RazorPagesSection, System.Web.WebPages.Razor, Version=3.0.0.0, Culture=neutral, PublicKeyToken=31BF3856AD364E35" requirePermission="false" />
    </sectionGroup>
  </configSections>

  <system.web.webPages.razor>
    <host factoryType="System.Web.Mvc.MvcWebRazorHostFactory, System.Web.Mvc, Version=5.0.0.0, Culture=neutral, PublicKeyToken=31BF3856AD364E35" />
    <pages pageBaseType="System.Web.Mvc.WebViewPage">
      <namespaces>
        <add namespace="System.Web.Mvc" />
        <add namespace="System.Web.Mvc.Ajax" />
        <add namespace="System.Web.Mvc.Html" />
        <add namespace="System.Web.Routing" />
      </namespaces>
    </pages>
  </system.web.webPages.razor>
</configuration>

now run the project

Sunday, 25 September 2016

carousel with angular material 2

Owl-carousel with material 2:
Myself Pradeep (Sitecore Developer & Angular Material Designer)
You are thinking why we want our own custom carousel with material 2, Because
there is no component for carousel by angular material 2 team.
And i want in my website thats why i am here....
So lets start
In previous blog i just tell you that how to setup material 2 
and now i am going to create new component with material 2 for carousel.
to get source code for carousel component Source-code
first i am running my repository

and now its running successfully...


and i will be add carousel component in this button-toogle of demo-app web application.


So be careful and see all the snapshots and if any problem then please comment....
now open your repository with any IDE but i am using visual Studio Code because of intellisense


To create new component with material 2 you must come inside lib directory (src/lib)


now copy any component to create your own component with existing structure.... as i


paste inside lib directory and rename with carousel to all file


now start from down to up so first open package.json where all the setting about component and now all with carousel as i


now open index.html and rename with carousel


now open carousel .ts and remove all the code except basic requirement and rename module with MdCarouselModule


next open carousl.scss and keep it empty for future change


now in last open carousel.html and make entry for dynamic markup


now it's time to make entry inside dictionry that you have new component for this we expand all directory and open all.ts


and make entry for carousel


and scroll down make this entry also


  this is also and after all this save file


and now open system.config.js inside lib directory and make entry for carousel


and make entry for external for owl-carousel.js and also map entry after that save file.


now for some moment please revise and check that everything done without any issue.if you have any issue till now then please comment with tag:1 i will understand in which part you are getting problem

Now i am going to use this component inside other project in sample project we have demo-app site
before start first go inside demo-app and open system.config and make entry for carousel to use inside this project


and scroll down and make entry for jquery as well as js for owl-carousel and map that jquery to use


now open index.html and make entry for owl-carousel css cdn link


now i am writing markup for own-carousel inside button-toggle


and initialize image object to use inside carousel


now run the project


Hey congrats it's running smoothly....

if you have any query, suggestion and want to help me teach me then please comment...
You comments are valuable for me

  • and also give you feedback doesn't matter that it will be positive or negative...

Sunday, 11 September 2016

Sitecore: Helix Design Principle

Helix is a set of design principles and conventions for Sitecore development.
So why I need Helix guidelines?
Whenever you develop any application or system, you need to follow some guidelines in order to ensure compliance with various essential parameters. So for example scalability, efficiency etc.
Helix provides set of guidelines for developing Sitecore solutions in order to improve efficiency, effectiveness, reducing costs, and time to go to market. 
What are the benefits of Helix guidelines?
Sitecore provides Habitat which is a Sitecore project developed using Helix principles. Habitat provides lots of pre-built and tested set of common modules. 
So developing Sitecore solutions using Helix will have following advantages.
Shorter Learning Curve
People who are familiar with the Helix principles/conventions or the Habitat example will be able to work more easily on other convention-based projects with minimal training. So learning curve will be reduced for moving team members from one project to another one.
Better Sitecore Product Support
Sitecore will be able to provide better product support to projects built using the Helix conventions, enabling them to resolve issues more quickly. Currently, whenever we ask for support, it takes the time to get support from Sitecore team as they have to reproduce environment.
More reliable solutions
If we develop projects using Helix principles which will make it compatible with Sitecore conventions. This, in turn, will make the project more reliable as these principles are well thought and all the modules are well tested.
Easy upgrade process
As we develop a Sitecore solution using recommended conventions, Sitecore will be able to provide better guidance on how to update and upgrade existing Sitecore projects when new versions and new products are released.
Less time to go to market and reduced cost
Habitat provides well tested pre-built components which can be consumed to develop Sitecore solutions and so reduced time.
How do you start on this?
First, you need to understand the terminology for Helix conventions. If you are developing Sitecore solutions for some time, you will understand these terms but the scope for some familiar terms are expanded. So let us take an example of Assets definition which is as follows:
Technically an Asset refers to a digital asset such as images, but can also mean the actual output from any process or task in your entire application lifecycle: code, files, visual design, data, content, configuration changes, deployment packages etc.
You can find the definitions at http://helix.sitecore.net/introduction/definitions.html 
What are the important aspects of Helix Architecture?
Helix is often referred to as Component-based Architecture or Modular Architecture.
Sitecore uses this architecture approach for some good benefits like reusability and rapid development, but as per Sitecore, core motivators behind the conventions are simplicity, flexibility, and extensibility in the implementation.
We need to understand three basic aspects of Helix and modular architecture:
Logical architecture of Helix
Image Source: http://helix.sitecore.net  
Dependencies which describe how feature and functionality in the solution are coupled.
It is always highly recommendable to have High Cohesion and Low Coupling between features.
Not Recommended Practice (Uncontrolled Dependencies, High Coupling)
Recommended Practice (Controlled Dependencies, Low Coupling)
Layers which control the direction of dependencies and thereby assure a manageable solution.
The layer concept is to provide dependency flow completely clear everywhere in the solution, in Sitecore, in Visual Studio and even in the file system.
Additionally, the layers provide a structure that helps in maintaining the project for the long term.
Modules – To decouple the features/functionalities. This provides ease in the development process. In Helix, modules are business-centric.
These are examples of modules in the Habitat example site:
Feature/Accounts
This feature handles everything involving user accounts: login, registration, xDB integration, user profiles, etc.
Feature/Navigation
All elements of navigation on the website are handled by this module. This includes primary and secondary menus, breadcrumbs and link lists.
Domain Language
This is another very important aspect. Domain language is to decide terminology and naming between developers and business users. The development team should remember that true users of the code are business users and not the developers or technical project members. So it is very important to choose the term very wisely so that it can be understood by everyone.
Solution Structure
All the conceptual modes should be grouped logically and not by VS projects so all Visual Studio projects belonging to a logical module should be managed together in one VS solution.
Following is the example from Habitat project.
Image Source: Habitat project
Solution Structure
Each solution to have “Feature”, “Foundation”, “Project” for each module. You can then group these modules into their own solutions. You can have more folder in addition to above but they will not act as layers.
All of above is to make features easily discoverable, and so they all should be in layers.
Projects
Projects are grouped together in a solution by the layer and module to which they belong.
Following is the example from Habitat project.
Image Source: Habitat project
A project, and assembly, should be named in a namespace-like fashion with:
  • The overall customer, partner or solution name
  • The layer (optional for project layer modules)
  • The logical module grouping (optionally)
  • The module name
  • The logical function of the project
  • File and Disk Structure
  • Managing Sitecore Items
  • Templates
  • Page layout
  • Configuration and settings
  • Multi-site and multi-tenant
  • Language and culture support
  • Security and workflows
  • Coding
  • Visual Design and Theming
  • Development
  • Build and integration
  • Testing
  • Deployment.

In addition to above, there are principles/conventions for following which needs to be followed.
For more detail, you can look at http://helix.sitecore.net/

Saturday, 10 September 2016

Material 2 Setup

Hello Guys,

Myself Pradeep, and today i'm going to tell one of the most popular technologies these date....
Image result for angular material 2

Are you exited to know what will be that so i'm telling to you!!!!
And without wasting time i'm coming to the point and the topic is "Angular Material 2 Design".

Today i will show you that how can you how to setup material 2 and use them in your web project or for your client ....And i believe you know the advantage of using material design...

You know Material 2 uses "NodeJS, Angular 2, Typescript, Gulp, SCSS and many more...." So you can guess that what are you going to earn from here.
Image result for angular material 2,typescript,SCSS,gulp
So before setup material 2 on your local system first you must follow all the step (at least read once, bcz if you leave any point then your whole attention will be wasted.) :

Step.1(Installation):


First check do you have node (latest version) at least 5.5.0 (if not then you must install).

Now to check node is installed on your local system:

goto cmd
               >node -v    
or
               >node --version


 After that Open cmd as administrator and type
             > npm install -g gulp


Step.2 (Initialization):

now its time to clone the repository from GIT (click here to clone the repository) by going to the location where you want to put your code.

after cloning go inside the project .
Now open cmd as administrator and install npm dependencies as project folder.

goto cmd
            > come to project's location
            > npm install

and wait

after successfully installation

To Build the project
         > gulp build: components

if build successfully then run the project by
        > gulp serve:devapp


After running this cmd you will see this ...


And now enjoy your project is now running successfully...

Enjoy Guys, and need any help or any suggestion then plz comment i will reply as soon as possible....