Hello Guys!!!
Myself Pradeep (Sitecore Developer), and i'm going tell a small Reciepe for Sitecore.

In these recipe i will use these following items:
1.SIM(Sitecore Instance Manager)
2.VS 2015(Visual Studio)
3.SQL Server
4.IIS(Internet Information Service)
5.Sitecore Rocks (Nuget Package)
6.Git(Source Control)
Hey don't worry about all these raw materials which i'm going to use in this recipe.
Before starting to prepaire reciepe i would like to share my experience with sitecore
Yes, i know, i have not enough experience in Sitecore but i will tell you that how i learnt Sitecore as a fresher (mine first technology that i learnt as professional).
So i just play with Sitecore while i'm working.
So Let's Start....
First if you do not have these items that discussed above then plz take these from Google Baba(GrandFather).
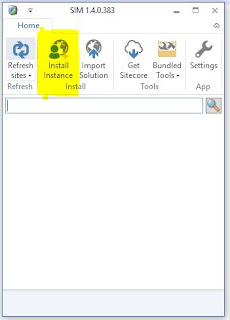
Now it's time to first prepare SIM and know about this?
So here we just see Snapshot and i believe you will definitely practice parallel to me as i shared the snapshot.

1.After installing SIM click on setting Icon

2. now you will see some field on next page of SIM
Give Instance Root path most of the cases developers put sitecore instance under C://initpub//webroot
Give SQL Server Connection String ServerName, UserName and Password.
Give Sitecore Licence File path.
Give Sitecore zip file path for local repository.

3.After filling all these fields, just see Advanced Setting Button.
If you want to customize Sitecore Instance more then go inside, otherwise no problem.


4. After that you can also see about SIM by clicking on About button. And directly jump to apis, documentation and more....

5. Now we are going to create new instance so there are two ways to create new instance:
first is to create from scratch.
Give Sitename only -> next -> wait for installing new instance -> Open in Browser(or you can choose according to yours.) -> finish.


And other is by Importing existing sitecore instance which will given in real time Environment
(By your Teammate, Team Lead, or by Architect).

Export database Name -> next -> Give Sitecore Database instance -> export -> wait -> finish.


6. Right click on Sitecore instance on SIM and select the option that you want to select can also open Visual Studio Solution file from here.

7. Now move to Open Tab...
and can open Sitecore Client from here also with any of the browser.

Can directly jump to any website folder as shown on snapshot.

Can also open cofig related filse from here can take the help from snapshot.

Want to update Licence or more from Sitecore instance then you can also.

And after creating sitecore instance if you guys want to change the hostname using SIM
then it's very easy you have to go just under Bundled Tools

click on the Host Editor and add the host sitename according to you like this

also can install MongoDB.
 Now it's time to move Visual Studio.
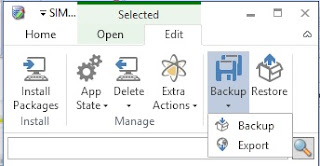
 8. Now move on Edit tab...
You can install package to your sitecore instance for example you want to create Sitemap for your website then just download package from Sitecore marketplace and and import from here in your current sitecore instance

If there is any problem with your sitecore instance then delete instance from here but i'm not going to delete mine instance because there is no problem here for my instance.
But remember one thing when you are going to remove sitecore instance then stop the IIS.
 Because i took backup for my sitecore instance from Backup icon on SIM and this is the best tool of
SIM you do not go to SQL management serice you can also create backup of your sitecore instance
just by clicking one button.
 now wait for some time to create backup file.
 now click on next button to create backup for your sitecore instance.
 click on finish button.
 To verify that is there any backup file is created or not?
 go inside backup file you will see all the database file for your sitecore instance.
 Now suppose you did something wrong with your sitecore instance then just click on restore button.
 and select recently created backup file for your sitecore instance.
 wait for sometime to restore database.
 now click on finish button.
 Now it's time to move on root folder location
 Under data database you will see licence, log and more that will useful for
sitecore instance And package under which you will see installed package.
 Now goto database inside Data database directory take help from snapshot and
you will see all the database file for your sitecore instance


 So my advice is to first copy of your website database for your sitecore instance because in future
Myself Pradeep (Sitecore Developer), and i'm going tell a small Reciepe for Sitecore.

In these recipe i will use these following items:
1.SIM(Sitecore Instance Manager)
2.VS 2015(Visual Studio)
3.SQL Server
4.IIS(Internet Information Service)
5.Sitecore Rocks (Nuget Package)
6.Git(Source Control)
Hey don't worry about all these raw materials which i'm going to use in this recipe.
Before starting to prepaire reciepe i would like to share my experience with sitecore
Yes, i know, i have not enough experience in Sitecore but i will tell you that how i learnt Sitecore as a fresher (mine first technology that i learnt as professional).
So i just play with Sitecore while i'm working.
So Let's Start....
First if you do not have these items that discussed above then plz take these from Google Baba(GrandFather).
Now it's time to first prepare SIM and know about this?
So here we just see Snapshot and i believe you will definitely practice parallel to me as i shared the snapshot.

1.After installing SIM click on setting Icon

2. now you will see some field on next page of SIM
Give Instance Root path most of the cases developers put sitecore instance under C://initpub//webroot
Give SQL Server Connection String ServerName, UserName and Password.
Give Sitecore Licence File path.
Give Sitecore zip file path for local repository.

3.After filling all these fields, just see Advanced Setting Button.
If you want to customize Sitecore Instance more then go inside, otherwise no problem.


4. After that you can also see about SIM by clicking on About button. And directly jump to apis, documentation and more....

5. Now we are going to create new instance so there are two ways to create new instance:
first is to create from scratch.

Give Sitename only -> next -> wait for installing new instance -> Open in Browser(or you can choose according to yours.) -> finish.


And other is by Importing existing sitecore instance which will given in real time Environment
(By your Teammate, Team Lead, or by Architect).

Export database Name -> next -> Give Sitecore Database instance -> export -> wait -> finish.


6. Right click on Sitecore instance on SIM and select the option that you want to select can also open Visual Studio Solution file from here.

7. Now move to Open Tab...
and can open Sitecore Client from here also with any of the browser.

Can directly jump to any website folder as shown on snapshot.

Can also open cofig related filse from here can take the help from snapshot.

Want to update Licence or more from Sitecore instance then you can also.
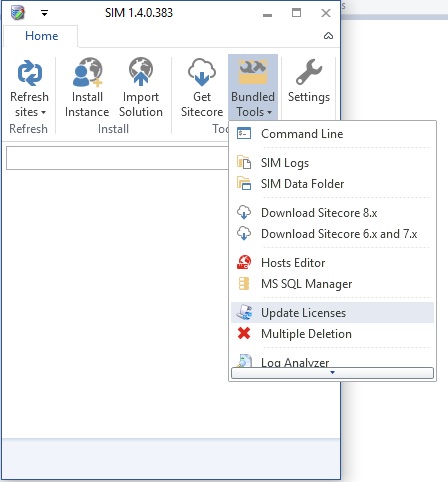
And after creating sitecore instance if you guys want to change the hostname using SIM
then it's very easy you have to go just under Bundled Tools

click on the Host Editor and add the host sitename according to you like this

also can install MongoDB.


You can install package to your sitecore instance for example you want to create Sitemap for your website then just download package from Sitecore marketplace and and import from here in your current sitecore instance

If there is any problem with your sitecore instance then delete instance from here but i'm not going to delete mine instance because there is no problem here for my instance.
But remember one thing when you are going to remove sitecore instance then stop the IIS.

SIM you do not go to SQL management serice you can also create backup of your sitecore instance
just by clicking one button.


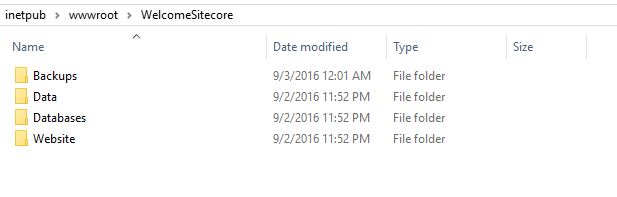
sitecore instance And package under which you will see installed package.

you will see all the database file for your sitecore instance


if accidentally you website database corrupted then take copy from there Best of Luck
if you do not do this process.

Thanks for your attention !!! And plz comment if you have any problem or doubt, so that
if you do not do this process.

Thanks for your attention !!! And plz comment if you have any problem or doubt, so that
i can also learn from you guys.
