Before Going to start i would like to tell you that you can setup jasmine test framework with three way on your project.
So i am going to start explaining and also show you snapshot and setup jasmine parallely
Way.1
Jasmine Test Framework with Visual Studio :
to begin setup i would like to tell you prerequisite to work with Jasmine
you should have
Visual Studio 2012 or more
ASP.NET MVC 5.0
Jasmine Test Framework
Now make sure that you are going to create .NET 4.5 project otherwise NuGet package manager will fail during installation process.
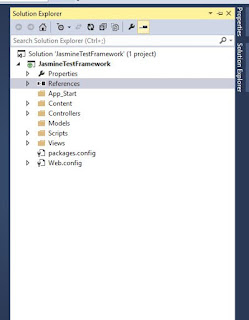
Create A Project:
create blank web application project.
and create directory named as App Start, Content, Controllers, Views, Models, Scripts
at root level.
now on top left select third icon View->Other Windows->Package Manager Console
and run this command
Install-Package JasmineTest

Hey wait guys, don't be hurry because we need to tell server that what to do when we request
which can be we do with creating RouteConfig.cs class inside App Start
and put this code there
And now add Global.aspx to project
and make entry this code under global class
Now create web.config under views direcotry
and paste the code
now run the project
So i am going to start explaining and also show you snapshot and setup jasmine parallely
Way.1
Jasmine Test Framework with Visual Studio :
to begin setup i would like to tell you prerequisite to work with Jasmine
you should have
Visual Studio 2012 or more
ASP.NET MVC 5.0
Jasmine Test Framework
Now make sure that you are going to create .NET 4.5 project otherwise NuGet package manager will fail during installation process.
Create A Project:
create blank web application project.
and create directory named as App Start, Content, Controllers, Views, Models, Scripts
at root level.

now on top left select third icon View->Other Windows->Package Manager Console
and run this command
Install-Package JasmineTest

Hey wait guys, don't be hurry because we need to tell server that what to do when we request
which can be we do with creating RouteConfig.cs class inside App Start
and put this code there
public static void RegisterRoutes(RouteCollection routes)
        {
            routes.IgnoreRoute("{resource}.axd/{*pathInfo}");

            routes.MapRoute(
                name: "Default",
                url: "{controller}/{action}/{id}",
                defaults: new { controller = "Jasmine", action = "Run", id = UrlParameter.Optional }
            );
}And now add Global.aspx to project
and make entry this code under global class
protected void Application_Start(object sender, EventArgs e)
        {
            RouteConfig.RegisterRoutes(RouteTable.Routes);
        }
Now create web.config under views direcotry
and paste the code
<?xml version="1.0"?>
<configuration>
  <configSections>
    <sectionGroup name="system.web.webPages.razor" type="System.Web.WebPages.Razor.Configuration.RazorWebSectionGroup, System.Web.WebPages.Razor, Version=3.0.0.0, Culture=neutral, PublicKeyToken=31BF3856AD364E35">
      <section name="host" type="System.Web.WebPages.Razor.Configuration.HostSection, System.Web.WebPages.Razor, Version=3.0.0.0, Culture=neutral, PublicKeyToken=31BF3856AD364E35" requirePermission="false" />
      <section name="pages" type="System.Web.WebPages.Razor.Configuration.RazorPagesSection, System.Web.WebPages.Razor, Version=3.0.0.0, Culture=neutral, PublicKeyToken=31BF3856AD364E35" requirePermission="false" />
    </sectionGroup>
  </configSections>

  <system.web.webPages.razor>
    <host factoryType="System.Web.Mvc.MvcWebRazorHostFactory, System.Web.Mvc, Version=5.0.0.0, Culture=neutral, PublicKeyToken=31BF3856AD364E35" />
    <pages pageBaseType="System.Web.Mvc.WebViewPage">
      <namespaces>
        <add namespace="System.Web.Mvc" />
        <add namespace="System.Web.Mvc.Ajax" />
        <add namespace="System.Web.Mvc.Html" />
        <add namespace="System.Web.Routing" />
      </namespaces>
    </pages>
  </system.web.webPages.razor>
</configuration>