Showing posts with label SITECOREROCKS. Show all posts

Monday, 4 September 2017

Pipeline using Sitecore Rocks

After working with Site Definition using Sitecore rocks. Now it's time to check and add new pipeline using sitecore rocks.

First you need to select instance and then right click select Manage option


now go to second menu section as Pipeline and you will see all the pipelines will be listed that are applied to the instance.


after selecting anyone of the pipeline like publish you will see all the processors applied to that pipelines
and if you wanted to add you own custom pipeline's processor by just right click


add entry for class and assembly, now test is it valid or not? 


If valid then you pipeline entry has been added, enjoy buddy.


Sunday, 3 September 2017

Cache using Sitecore Rocks

While development with sitecore, sometime content is not getting updated because of cache issue. To overcome this issue what usually we do:

1. <instance_name>/sitecore/admin/cache.aspx 

2. Recycle AppPool from IIS.

3. Browse page on private browser mode.

there is one more option but it is more flexible and much fast, yes it's with sitecore rocks.


Let's do practical on this:

First need to go instance, right click and select Manage option


after this will see Caches Section with cached listing items with all the properties.


let's select one of an item from cached listed items


After selecting one of an item will have two options:

either clear all cache means it will clear all the cached item which all are listed

or cache means it will clear cache of this item as well as child of this item also.


let's explore one of an item from the list, and will see all the child items


now from this list we will have option to remove from cache, instead of clear.


 Now suppose you are working on one of rendering and after the development just remove that item from cached list that's it.
you will see the new changes.


Hope will help this.


Saturday, 2 September 2017

working with Temp file using Sitecore rocks

It's always good to keep clean and minimized as much as possible. Like temp files on the sitecore instance reserve memory which is unnecessary and to remove/clear all the temp files at one place using sitecore rocks is very easy.

So let's start first go to instance and right click, select Manage option 


now jump to Temp Files section, here you will see all the temp files are listed will reserved space and path


you don't need to go particular file location, just right click on the file and perform your option as below.
Really by this i'm enjoying while development.


Thanks Sitecore Rocks to save our valuable time!!!

Friday, 1 September 2017

Site Definition using Sitecore Rocks

To add new site without using Sitecore rocks, usually we go to sitecore.config file and made the changes, which is more risky and we should have knowledge about all available attributes/properties while adding new site


But after spending sometimes on the sitecore rocks found pretty good way to add new site without worry about attribute/property. So let's start

By selecting instance and then right click, select Manage option:


After that Sites section is getting appear just down to the Section menu will get all the sites listed.
Here selected Shell and all the properties is getting displayed at the bottom. You can check all the properties applied to this site like Caching, Configuration, Content, Debugging, Devices, Filtering, Information, Inheritance, Security and main thing is Web
below we expanded Web property 


Now if wants to add new site to existing instance then just right click and select add new site option


After this will got property window for new site as below:


once all the info filled, after clicking on OK will get popup to save separate newsite.config just save this to website/app_config/Include


Congrats new sites entry is successfully added to sitecore instance.
Now it's time to work with pipelining using sitecore rocks


Properties on template using sitecore rocks

After creating template, it's time to add properties to the template.
Like
set icon on the template
     Help to identify the template belongs to which type.

Give the display name for that template
     On the template, we have an option to give the display name for template

sort the template fields
     We have also option to sort the fields on the templates

set insert options
     It's helpful to us when creating page item of this template type.
     It bound to content editor to create only given time of template type can be created.

or set the presentation details on standard value of the template
     It's always good to set presentation details on the template standard value. So that at the time of page creation by default these presentation will be applied.


Hope it will help.

Creating Package using Sitecore Rocks

After uploading, installing and creating Anti package using sitecore rocks.
Now It's time to create package using sitecore rocks.

Believe me it's fast and very easy to create package using sitecore rocks even you just need to drag and drop to include items/files while creating package.

After selecting sitecore instance right click and select Manage Package option as below:


and after that will get the option to Create package under Create Section select New Package and click on the Create button


Now will get three main sections:

1. Information Section:

 here you need to put all the necessary information related to package creation, and after giving all the information go to next section "Items"


2. Item Section:

In the Items section you need to drag and drop to include sitecore items (not file) as below selecting one rendering item to include


after dragging Item will getting also appear under the Items section. 


And if need to include all sub item of this item just right click on the item under the Items Section


3. Files Section:

after this it's time to add files to package go to , so you will have access of website and data folder directory to select files


after selecting the all the items/files it's time to build package means package creation.


after selecting build package will get the location option to save package which is going to create.


once select the location you will get success message of package creation.


 Congrats package has been created using Sitecore Rocks.


Thursday, 31 August 2017

Creating Anti Package Using Sitecore Rocks

After uploading package using Sitecore rocks you will got an options to create anti-package.

So let me tell you why it's safe to create anti-package while installing package each time.

"Anti-package means it will take backup of the Items/Files which is going to overwritten after installing package"

Let me explain more, Suppose a scenario where you are working on client project and if you are going to install sitecore package directly without creating anti package. So once package will be installed you can not get back the previous changes because it's overwritten after installing package.
That's why every time sitecore rocks ask to create anti package before installing and after uploading package.


Now it's time to create anti-package:

So just chill it's a process of only one click that's it.

After uploading Sitecore package you will get this window, you need to just click on the Create Anti Package 


and congrats your anti package has been created, really it's pretty fast and easy.


Enjoy buddy.
Now go back to the url to upload/install package

Upload and Install Sitecore Package using Sitecore Rocks

Hello Guys,

let's start by uploading and installing package using Sitecore Rocks.

After creating connection of sitecore instance with sitecore rocks right click on the instance
as below we did and then select MANAGE PACKAGE option


after that select the package child of Sitecore Rocks Section, and now you will see all the uploaded sitecore package on the existing sitecore instance.


Now click on the Upload and install  as on the top Middle button appeared on the window.


and now select package which you want to install.

@NOTE: There is one interesting thing with rocks that you can select to upload package from file system of any path (not necessary to select from "data/package") as above image selected from Picture directory

Generally on the Sitecore instance from Browser side we need to upload the package from package directory.


after selecting the package will see Install package-properties. Now here we have an option to either first create anti-package before installation or skip this step and just install package which we uploaded.


To create Anti-Package using Sitecore Rocks click here  and also explained why we need to create Anti-Package using sitecore rocks

 after the creation of Anti-Package now it's time to install package. So just click on install and great your package is installed successfully!!!


Package using Sitecore Rocks

Working related to Package tasks using Sitecore Rocks is really amazing experience and absolutely pretty fast as compare to Sitecore Instance on Browser.


Let me describe why to work package related task with Sitecore rocks:

1. Suppose your package is outside to the package directory (by default which is inside <sitecore instance>/data/package), then you can easily upload and install that package using Sitecore Rocks, and i think this is not possible with Sitecore instance with Browser.

2. Speed, yes speed on the browser side most of the time package installation takes too much time or just loading and loading, But with Sitecore rocks it's pretty fast and easy.

3. You can create Anti Package at the time of installing package. And this is one of the best features of Sitecore rocks and will describe later why we should create Anti Package while installing package.

Please go through with below blogs related to Package tasks which divided into parts:

1. Upload/install Package using Sitecore Rocks
2. Creating Anti Package using Sitecore Rocks
3. Create Package Using Sitecore Rocks

Tuesday, 29 August 2017

Rebuild with Sitecore Rocks

Rebuild the index and link database with sitecore instance browser is little bit headache because of session expire. Sometime browser through and error to kill the process.


To avoid this issue i will suggest you to do the rebuild process from sitecore rocks side, it's pretty much fast as compare to browser side.


just goto database-> tasks->(Rebuild Link Database/Rebuild Search Index).


Have a good day, Enjoy with rocks!!!

Sunday, 27 August 2017

Creating template with sitecore rocks

It's easy and fast with rocks to create items.

Let's start with creating Template, here attaching screenshots and pointing steps to create template please check with these:

Step.1
Go to Master Database (here i scoped to master database, that's why only master database is getting appear on the tree).
Go to template at /sitecore/template after this go to the path/directory where we wants to create template(template/sample)


Right click to Sample Template Folder(sitecore/template/sample) select "New Template"


After this give the template name.
If required then create standard value (but it's good and best practices to create standard value while template creation)
After this inherited with templates to use the fields of another templates. By the ways default base template "Standard template" is already inherited to newly created template.

We can add more template while inheriting or can also remove templates from inheritance.

After inheriting more than two template we can set their position by up and down arrow.


After successfully giving property to template now it's time to add field section and field to the template.


 Congrats template has been now created.

Saturday, 26 August 2017

Creating connection with Sitecore Rocks

To create connection Sitecore Rocks with Sitecore Instance

First you should have Sitecore Rocks tool/extension installed in your Visual Studio, if not installed then please check with my previous blog that How to Install Sitecore Rocks with Visual Studio

After the Successfully Installation with Sitecore Rocks, now it's time to create connection with Sitecore instance.


1. On the top of the Solution Sitecore Tab is getting displayed click on that tab and select "New Connection"


2. Fill the Host Name, Sitecore Connection Credential and wwwroot sitecore instance path these three fields are required to create connection and that is required for the fiirst time.


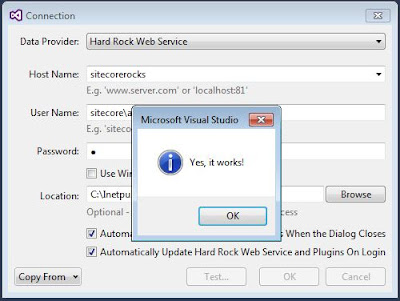
3. After this test that connection is created or not? And if connection will created then you will get "Yes It's work" success message.


4. Now click OK twice and after this select Sitecore Explorer.


@Note: One important thing is always scope to the project's database where you are going to work. Like for development most of the time will work on the master database


You can also scope to the content/rendering/template level as per your requirements, it will reduce the chance of getting mistake.

Thursday, 24 August 2017

Installing Sitecore Rocks with Visual Studio solutions

It's very easy and quick installation of sitecore rocks with Visual Studio Solutions.

Please follow the steps to install the Sitecore Rocks:
1. Open Visual Studio
2. Go to Tool Tab(placed on the top of the Visual Studio)


3. Select "Extensions and Updates..." option
4. After that on the left side select "Online" and now on the right-top search "Sitecore Rocks"


5. Now install and after successfully installation restart the Visual Studio.


Congrats Sitecore Rocks is now installed Successfully.